Dynamic Link
What Does This Plugin Do?
Level of Difficulty: Easy
Compatibility: Chatfuel*, ManyChat
*Important Note about Dynamic Link
- Chatfuel Users: You can create time and date-based rules with Chatfuel, but you cannot create tag-based rules.
- Dynamic Link Expiration: A Dynamic Link can be generated multiple times. But once the dynamic link is generated and saved into a custom field/attribute, that link is valid for 120 days.
- Interactions: This plugin will use 1 interaction each time a dynamic link is generated for a user AND each time a user clicks on a dynamic link.
Example Use Cases
Time-Based Link
Redirect users to a different URL before or after a specific date or time (eg. relating to a promotion or event)
Tag-Based Link
Redirect users to a different URL depending on their tags (eg. whether they are tagged as a customer or subscriber)
Time & Tag-Based Link
Redirect users to a different URL depending on their tags AND the current date and time
*Note for Chatfuel Users – you can only create time-based rules. You cannot create tag-based rules.
How-To Setup the Plugin
Follow the 3 Simple Steps...or Login to CodelessBot to access the Plugin Wizard!
Step 1. Download & Install the Quick-Start Plugin Template
Login to CodelessBot, navigate to Templates on the sidebar and download the Quick-Start Template. Follow the prompt to install the Template. Next, you'll need to create a copy of the template for this specific plugin. See and follow the instructions below.
(If you've already install the Quick Start Template and created a copy of the plugin template - skip this step!
Chatfuel Instructions
a. From your Chatfuel dashboard, open the new bot called "JSON API Tutorial & CodelessBot Template"
b. Find the group containing the name of this plugin.
c. Click on the arrow next to the plugin name to clone this group and blocks from the template into your own Chatfuel Bot.
d. Navigate back to the Chatfuel Dashboard
e. Open your Bot and find the new plugin group that you just cloned.
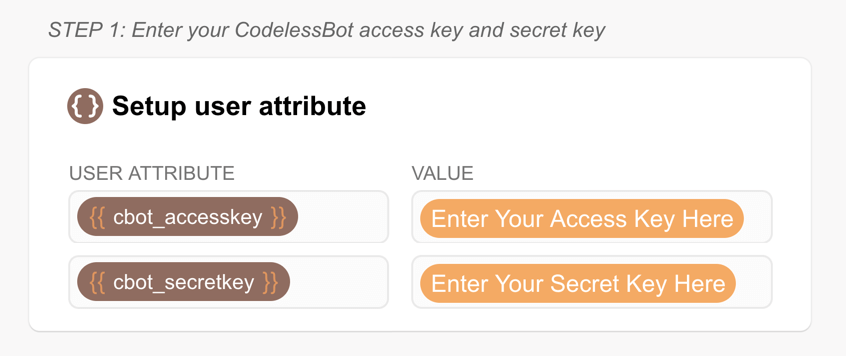
f. Open the new Plugin block and enter in your CodelessBot access key and secret key.
Tip: Rename the plugin block to something more meaningful. For more details, refer to the Getting Started Guide.
ManyChat Instructions
After you download and installed the Quick Start Template...
- From the ManyChat sidebar, click on the Flows"
- Open the folder "CodelessBot Templates"
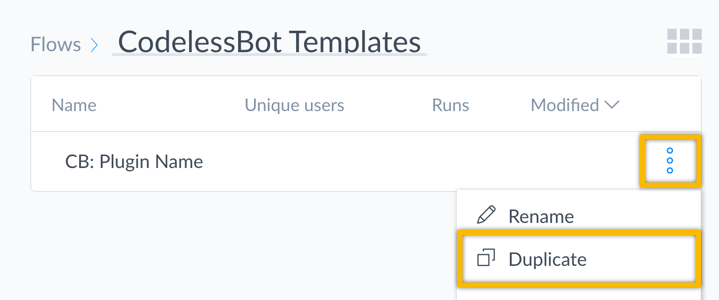
- Find the flow containing the name of this plugin.
- Create a copy by click on the three dots icon on the right
- Then click on duplicate
- Feel free to rename this new flow and move it to a different folder
- Open up the flow and click on the "Starting Step" to modify the information you'll be sending to CodelessBot
For more details, refer to the Getting Started Guide.
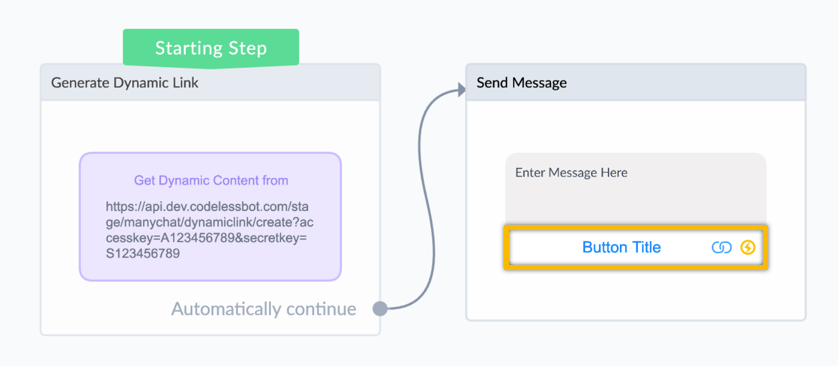
Step 2. Create Dynamic Link in CodelessBot
Login to the Member Portal and create a new Dynamic Link. (Already created your Dynamic Link? Skip this step!)
Instructions
- Login to the CodelessBot
- On the left-hand sidebar, click on “Dynamic Link”
- Up in the top right, click on the button “New Dynamic Link” and follow the on-screen instructions
Step 3. Send information to CodelessBot
You’ll need to send CodelessBot the following information:
cbot_link_id
The ID for your Dynamic Link.
More Detail
To find your Dynamic Link ID, login to the CodelessBot Member Portal and from the sidebar, click on Dynamic Link.
cbot_messenger_id
The user’s Messenger ID.
More Detail
The Messenger ID is a default system custom field/attribute that is automatically create by your bot platform.
Chatfuel Instructions
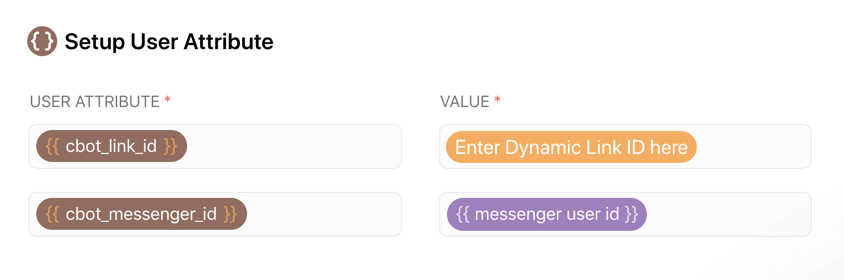
- In this plugin block, there should be a 2nd “Setup user attribute” card with 2 attributes
- For cbot_link_id, copy and paste the ID of the Dynamic Link
- For cbot_messenger_id, the value has already been set for you (No need to make any changes)
ManyChat Instructions
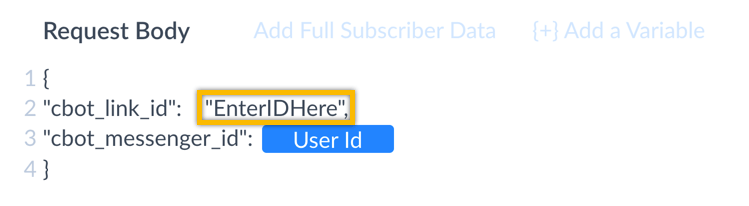
a. Click over to the “Body” tab 
b. For cbot_link_id, copy and paste the ID of the Dynamic Link. Be sure not to remove the quotations or comma.
c. For cbot_messenger_id, the value has already been set for you. (No need to make any changes)
Tip: To check if you set this up correctly, click on “Test the Request” and you should get a success “200 OK” response
Step 4. CodelessBot will reply with the "answer"
CodelessBot will reply back with the following information:
Your custom field/attribute
The dynamic link will be saved into the custom field/attribute you entered in the Dynamic Link Editor.
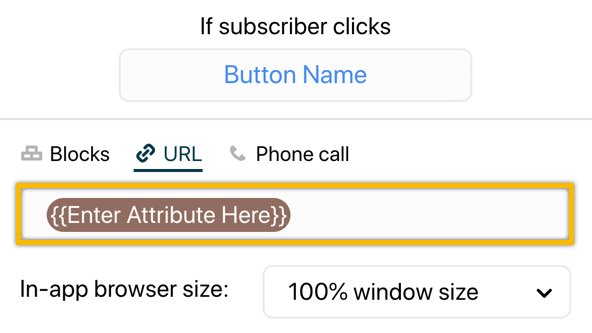
Chatfuel Instructions
Scroll down to the text card at the very bottom of the Dynamic Link block:
- Click on the Button
- For the URL, enter in the user attribute you used to save the Dynamic Link in the “Step 1 – Create Link”
Note: Feel free to replace or delete this text card and replace it with another element (eg. Gallery).
ManyChat Instructions
Finally, to make use of the Dynamic Link, you’ll need to insert your specified custom field as the URL for your button. To do this: a. Click on the Button in the Message Step
b. Under Website address, enter the name of your custom field you entered in the Dynamic Link Editor (in Step 1 – Create Link). Then click on “Done”
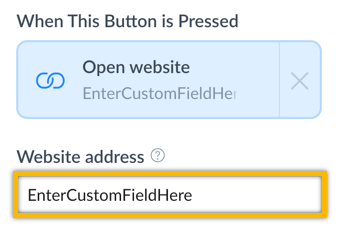
c. Click on “Publish” when you’re done and be sure to test your flow by clicking on “Preview”.
More Information
FAQs
1. I have multiple dynamic links. Can I use the same custom field/attribute to save my dynamic links?
Yes! You can reuse the same custom field/attribute.
2. Does the Dynamic Link expire once it's sent to users?
Yes. Once the dynamic link is generated and saved into a custom field/attribute, it will only be valid for 120 days.
3. How are interactions calculated for this plugin?
This plugin will use 1 interaction:
- each time a dynamic link is generated and saved AND
- each time a user clicks on a dynamic link
For example:
- Suppose you sent out a broadcast to 1 user where a Dynamic Link is generated and the user clicks on the link twice. You will be charged 3 interactions.
- If you sent out a broadcast to 2 user where a Dynamic Link is generated and both users clicks on the link twice. You will be charged 6 interactions.
If you’re worried about the number of interactions for this plugin, you can limit the max link visits for each user. This can be set in the Dynamic Link Editor in “Step 1 – Create Link” tab.
4. Couldn't I just filter my audience and send them different links?
Yes…but that’s not how the Dynamic Link works. The point of this plugin is to generate a SINGLE dynamic link where the final URL can change each time a user clicks on it.
The final URL will be based on the current date and time. Or whether the user has a certain tag at the exact time that the user clicks on the link.
For example, suppose you send out a message letting users know about the webinar that’s happening now. There’s a URL button that allows users to join the webinar. Some might not see this message and click on it after the webinar is over. With the help of the Dynamic Link plugin, you can create a date-based rule to redirect users to the replay page.
In other words: One link. Multiple possibilities.
5. The dynamic link isn't working. It won't redirect to the a URL!
To display a URL inside a webview, you’ll need to whitelist the domain. Otherwise, the card containing the dynamic link URL won’t be shown to users or you might get an error or warning message.
ManyChat Instructions:
- Click on “Settings” in the left-hand sidebar
- Click on Growth Tools up at the top
- You’ll see a section called “Authorize Websites”
- Enter in “api.codelessbot.com” and click on the add button
Chatfuel Instructions:
- Click on “Configure” in the left-hand sidebar
- Scroll down to the “Domain Whitelisting” section
- Click on the “add domain”
- Enter in: api.codelessbot.com
- Find the section “Messenger Extensions URLs”
- Enter in: https://api.codelessbot.com/*
6. I'm getting the error "refused to connect". How can I fix this?
It might be an X-Frame-Options or Content-Security-Policy frame-ancestors issue.
To learn more, you’ll need to review the Messenger Documentation and allow iframe to load on Messenger and Facebook Domains. (A developer might need to help you with this)
Enhance Your Bot with CodelessBot
CodelessBot plans start from $18/month