How to Create Personalized Images for your Messenger Bot
![]() By Dana Tran•Last Updated: Nov 5 2019 • 10 min read
By Dana Tran•Last Updated: Nov 5 2019 • 10 min read
![]() By Dana Tran
By Dana Tran
Last Updated: Nov 5 2019
10 min read
If you’ve been following the Messenger Bots for a while, you probably heard that it has amazing open rates of up to 80% and click-through-rates of 25%. Which is amazing! But as more marketers leverage this platform, you might need to find a more creative way to stand out – even if you have an amazing product, service or freebie!
To capture attention…your message needs to be helpful, personalized or packaged in an unexpected way! One way to achieve this is to send personalized images using your Messenger Bot.
In this tutorial, you’ll learn how to create personalized images for your Messenger Bot with the help of FotoScript, a CodelessBot Plugin. Then you’ll learn how to install FotoScript into your Chatfuel, ManyChat, or MobileMonkey Bot.
Table of Contents
- 8 Use Case for Personalized Images
- What You’ll Need to Send Out Personalized Images
- Want to Test Out FotoScript?
- How to Create Personalized Design with FotoScript
- How to Send Personalized Images using Chatfuel
- How to Send Personalized Images using ManyChat
- How to Send Personalized Images using MobileMonkey
- Summary
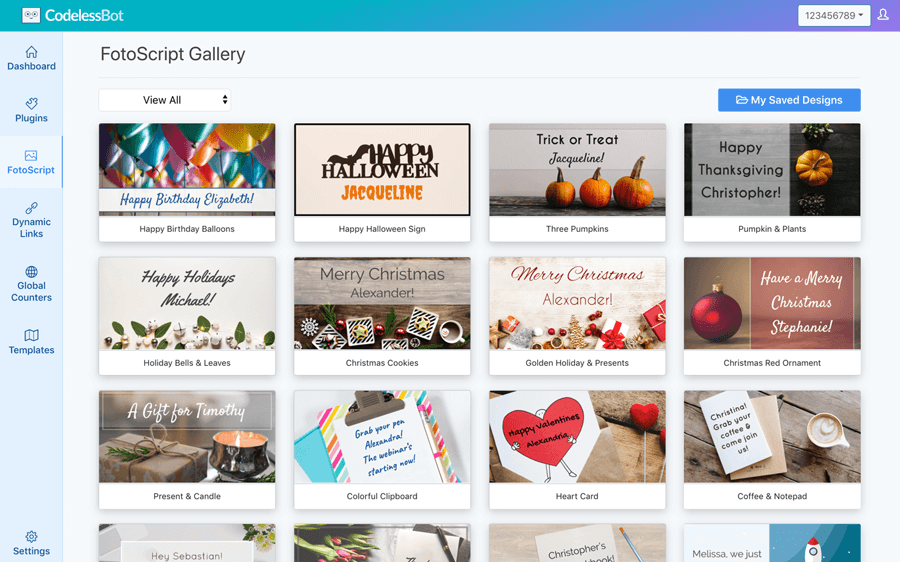
8 Use Case for Personalized Images
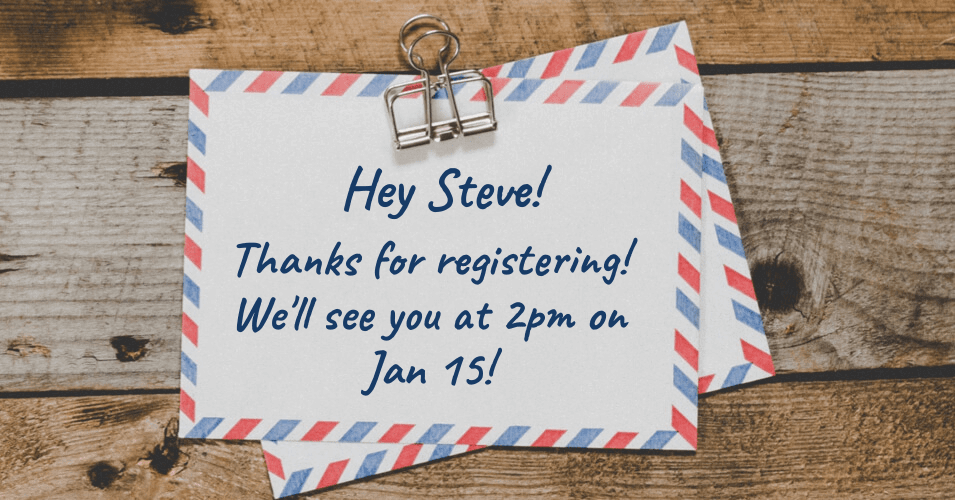
Use Case 1 – Event Invitation & Confirmation
Do you have a webinar coming up soon? Or maybe a live event? Instead of sending out a message using text and a generic image, you can send out a virtual invite!
You can send a personalized image with the visitor’s name and any additional event details, such as their selected date and time.
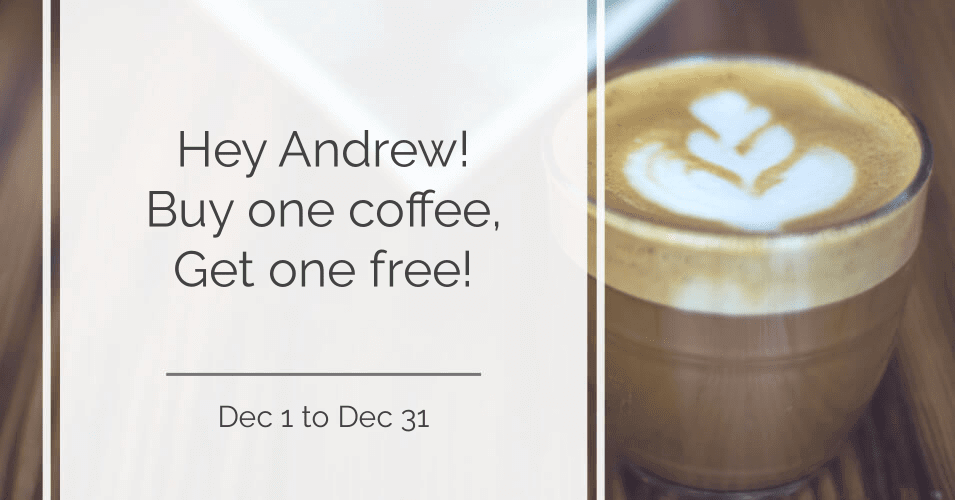
Use Case 2 – Coupons & Discounts
Issue a unique coupon and discount to your most loyal customers or new visitors! You can personalize this virtual coupon with a specific deal (e.g., buy one get one free…or buy one get two free).
You can also customize the image to show the expiration date.
Use Case 3 – Thank You
Show your appreciation by sending your customers a quick note after they made a purchase or after they attended your event.
(Bonus Tip: You can also follow up with a special offer or coupon!)

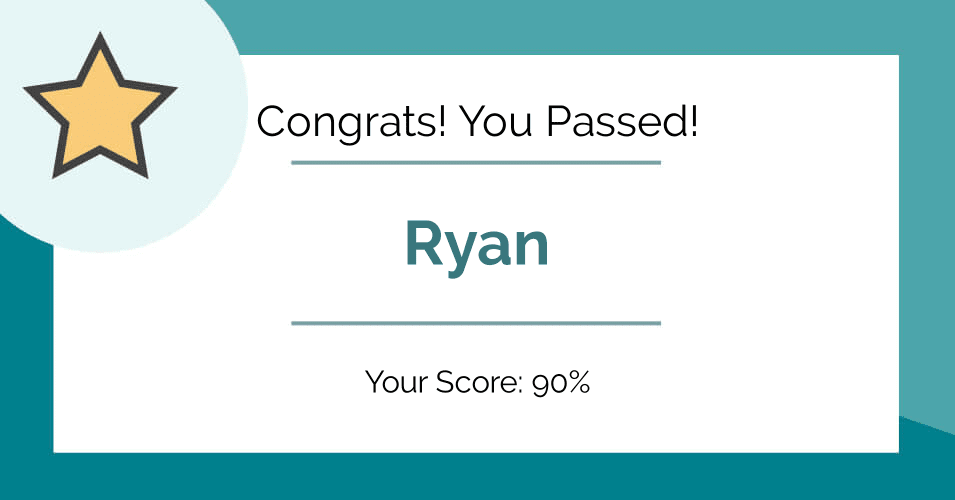
Use Case 4 – Certificates
After your bot visitor completes the quiz, don’t send the results in a (boring) plain text message. Create a certificate that includes their name and score!
You can also ask users to post their certificate on social media or share the results with their friends to encourage more people to take your quiz!
Use Case 5 – Cart Abandonment
Capture your visitor’s attention with a funny image or a picture of your store to remind them to finalize their purchase.

Use Case 6 – Greetings
Welcome your new Messenger Bot visitors with a fun seasonal image, or send them a gift on special occasions!

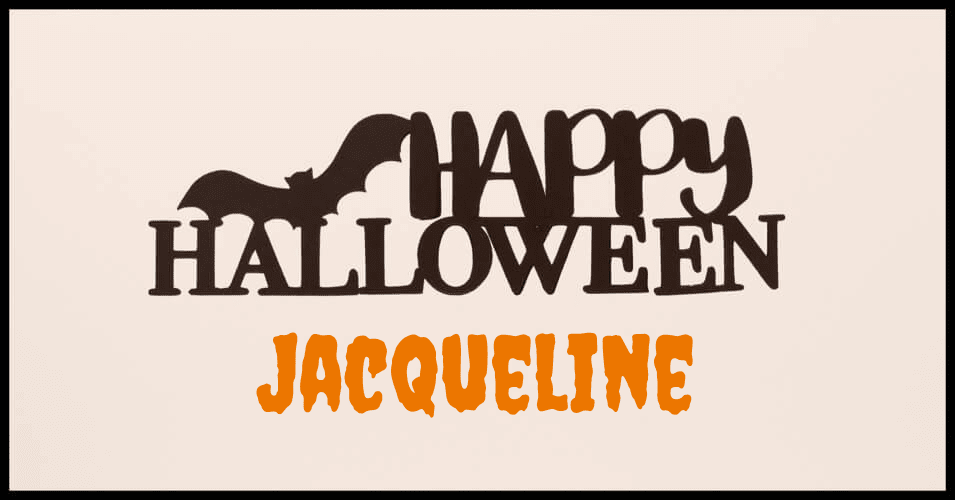
Halloween
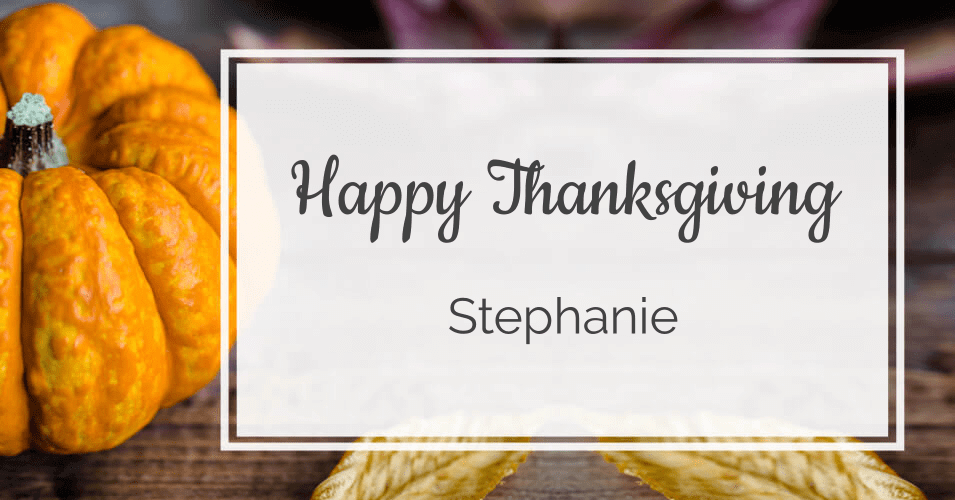
Thanksgiving & Black Friday
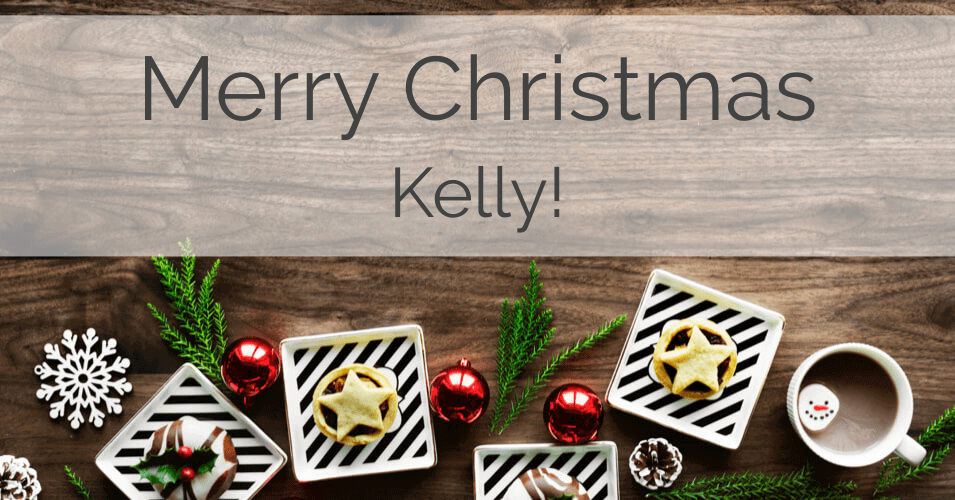
Christmas & New Years
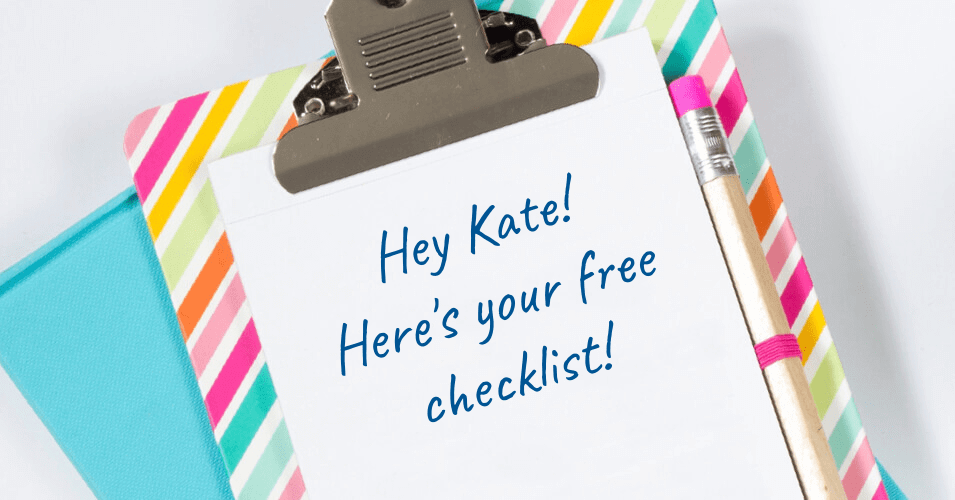
Use Case 7 – Checklist, Ebooks & PDF
Sending out a free lead magnet? Customize the image with your subscriber’s name to make it more personalized. Or show them a sneak peek of what’s they’ll be receiving when they click on the download button.
Use Case 8 – Encourage Your Bot Visitors to Invite their Friend
Let your bot visitors generate a sharable card with a personalized image, a custom message, and their friend’s name!
You can ask your bot visitors to share a great deal, send their friends an invitation to join a challenge, or ask their friends to beat their quiz score. (Just a few ideas!)
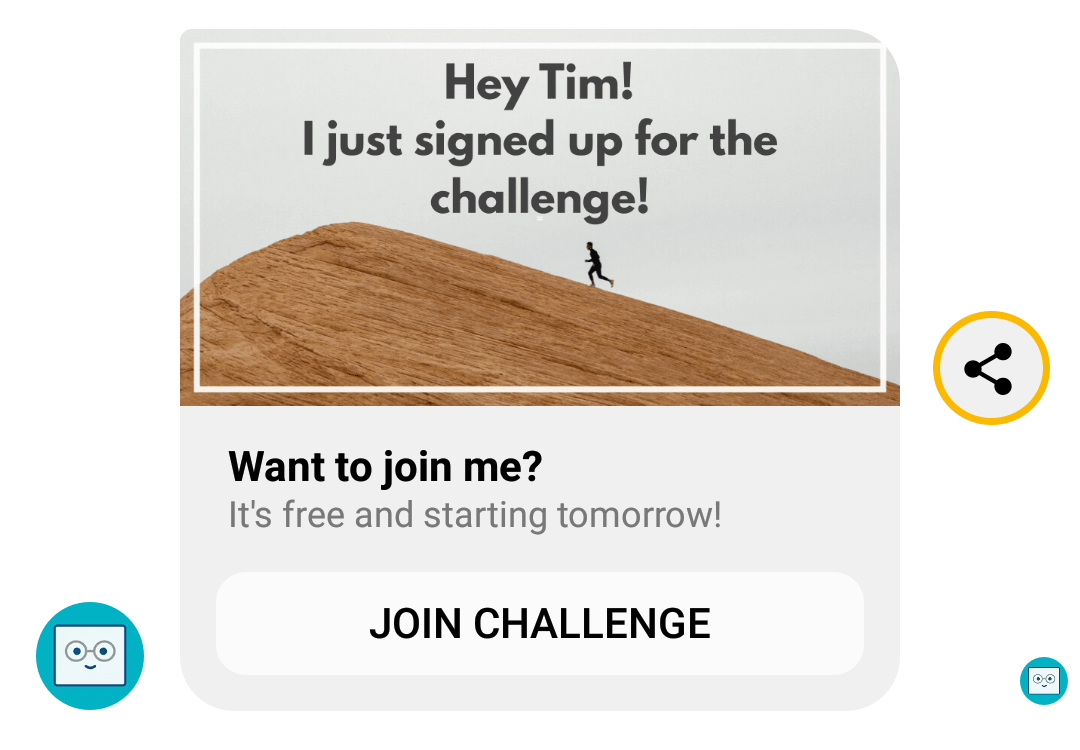
Challenge a Friend
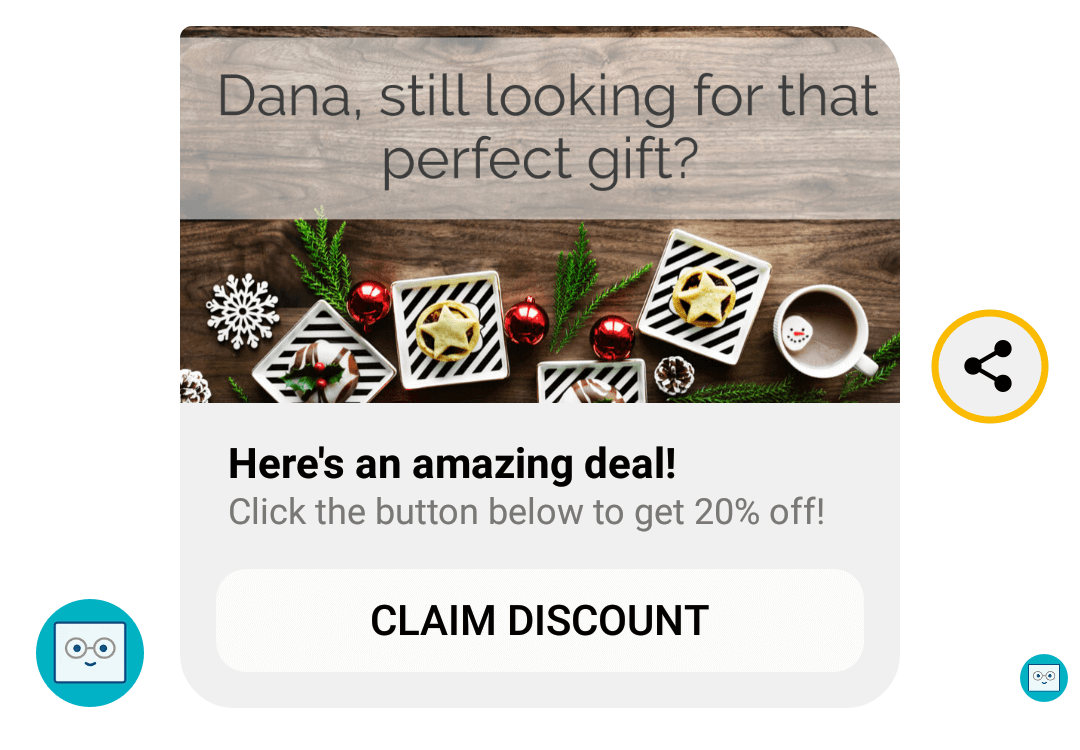
Share a Discount
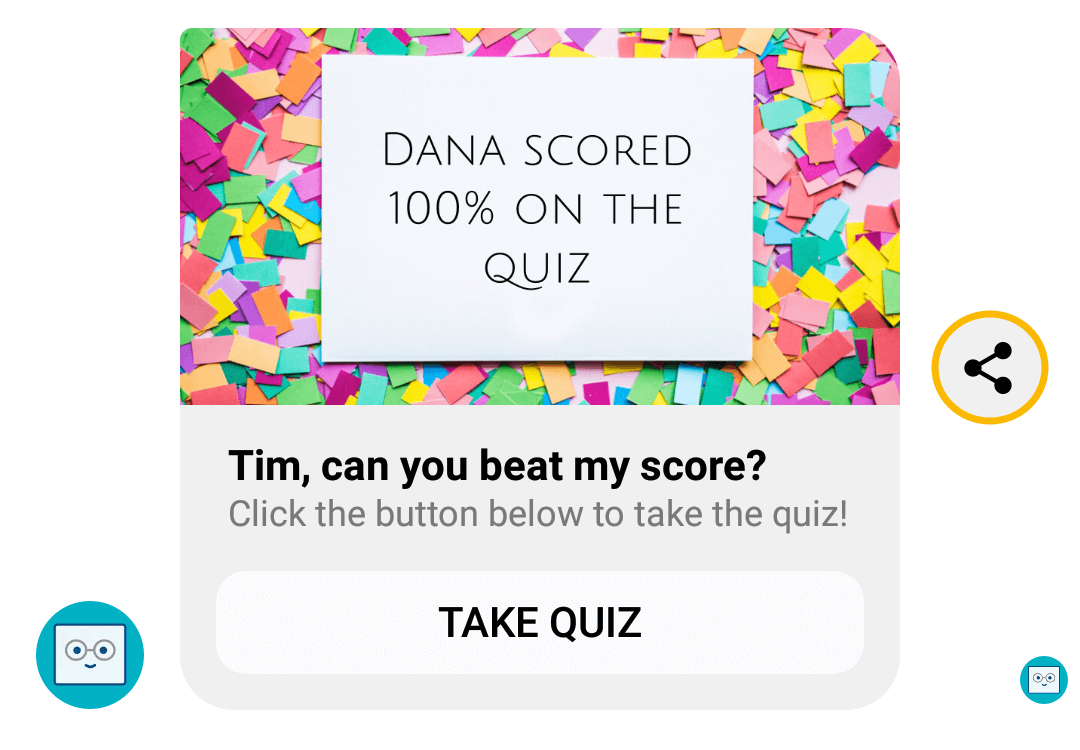
Beat a Quiz Score

Want to Test out FotoScript?
Click the button below and you'll receive a personalized image with a custom greeting and your name!
What You’ll Need…
To send out a personalized image to your Messenger Bot Subscribers, you’ll need:
- A Bot Building Platform
- Information about your Bot Visitors and/or Subscriber
- A Background Image or Design
- A Tool to Generate your Personalized Image
Let’s talk about each one in more detail…
1. A Bot-Building Platform
To build a Messenger Bot, you could build it from “scratch” (using code and your own server), but it is so much simpler, quicker and easier if you relied on a bot-building platform that lets you build a Messenger bot without any coding!
Here are 3 popular options: Chatfuel, ManyChat, and MobileMonkey. You’ll need to have a Pro ManyChat Account or Pro MobileMonkey Account. For Chatfuel, a regular free account will work.

2. Information about your Bot Visitor or Subscriber
Even though a personalized image with your user’s name is eye-catching, it’ll be more interesting if you can include another piece of information. To do this, you’ll need to get your Messenger Bot to ask questions to learn more about their interests or preference.
Then, save this information to a ManyChat custom field, Chatfuel user attribute or MobileMonkey attribute.
3. A Background Image or Design
There are plenty of sites where you can find free stock images, but here are 3 recommended free sites.
You can find over a million free gorgeous stock images at Unsplash. Pixabay has over a million high-quality stock images, but they also have illustrators and vectors!
Canva is an online image editor. It doesn’t have as many free images in comparison to Unsplash and Pixabay, but you can use it to edit your image design and add your “static” text.
4. A Tool to Generate your Personalized Image
You could spend hours manually create a personalized image for every single bot visitor using Canva…but you probably don’t want to do that!!
What you need is a tool that can automatically merge your visitor’s personalized information onto an image…and then have your bot send out the personalized image!
In the upcoming sections, you’ll learn:
- How to create personalized images with the help of the FotoScript Plugin and
- How to install FotoScript into your Chatfuel, ManyChat, or MobileMonkey Bot
Want to Test Out FotoScript?
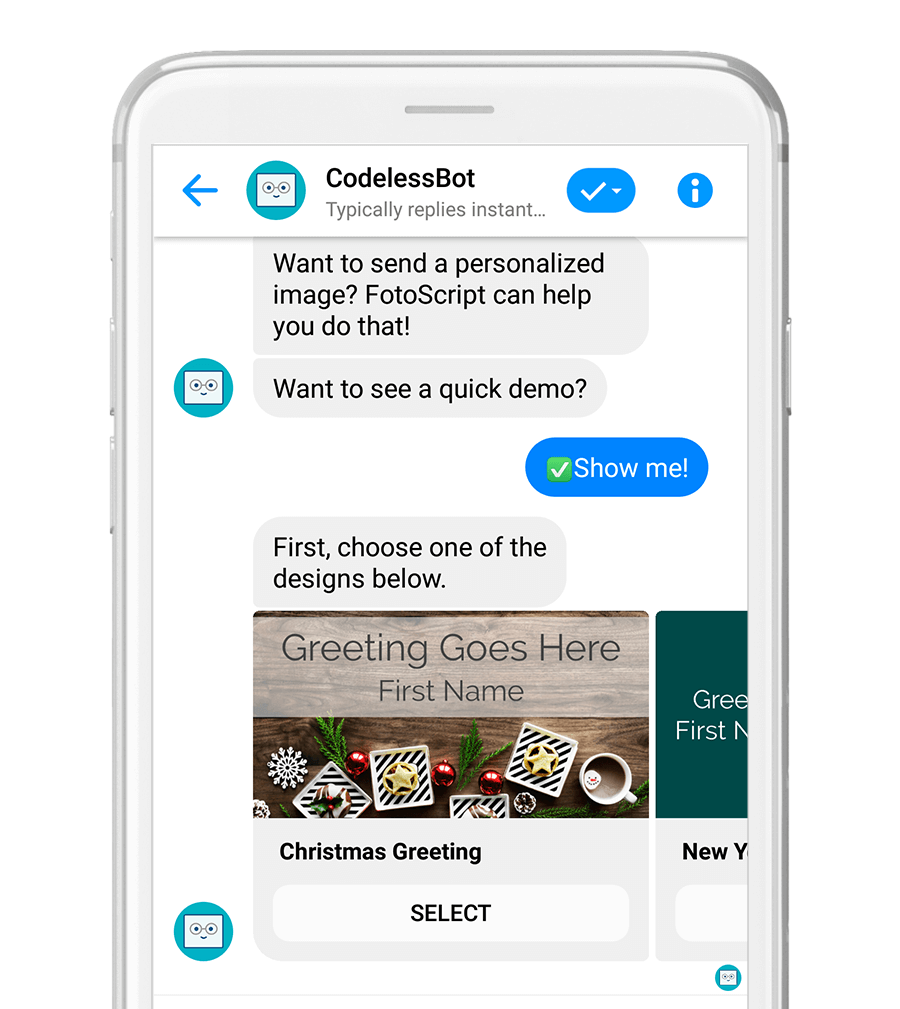
But before we go over the “how”, did you want to see a quick demo? It’ll take less than 1 minute!
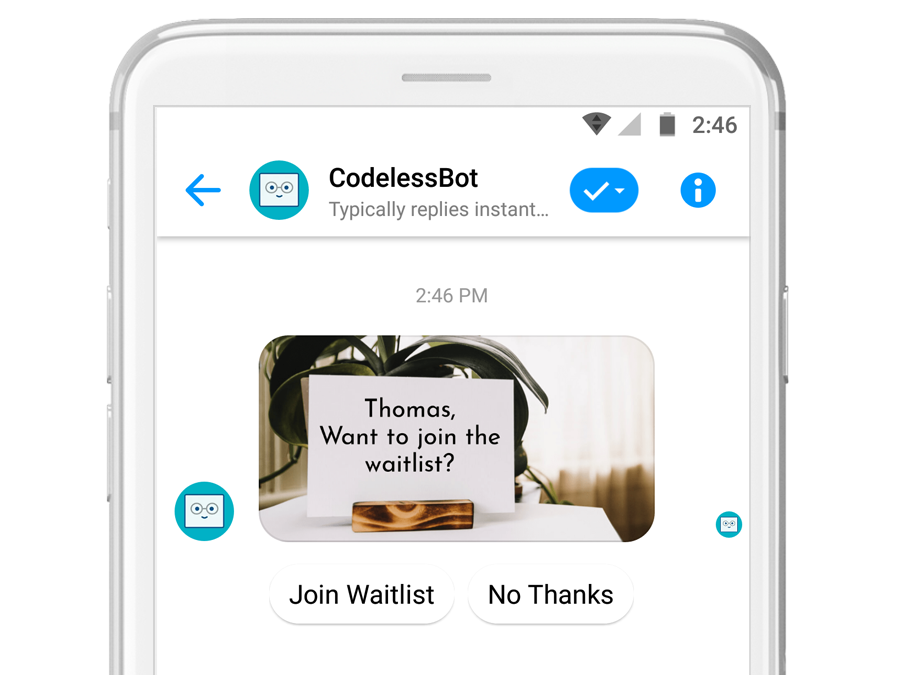
To generate a personalized image using FotoScript, just click on the blue “Get this in Messenger” button below. You’ll be prompt to enter a custom greeting.
Then, we’ll send back a unique image with your greeting and name!
Want to Test out FotoScript?
Click the button below and you'll receive a personalized image with a custom greeting and your name!
How to Create Personalized Images with FotoScript
As mentioned previously, we’ll be using the FotoScript Plugin in this tutorial to create a personalized image for your Messenger Bot. There’s no coding required and it only takes a few minutes to set up!
Here’s how FotoScript works:
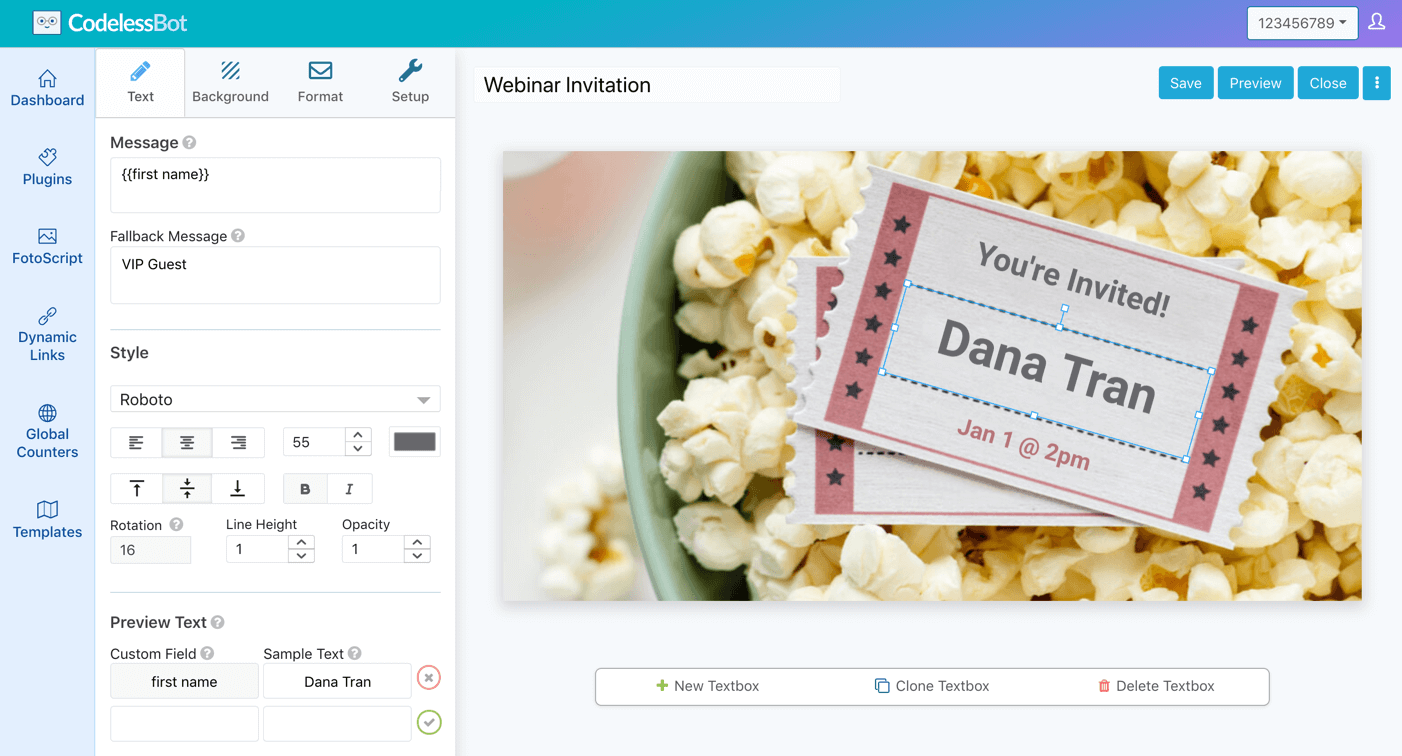
Step 1 – Select a Design
Login to CodelessBot and click on FotoScript in the sidebar. Browse and select a design from the gallery.
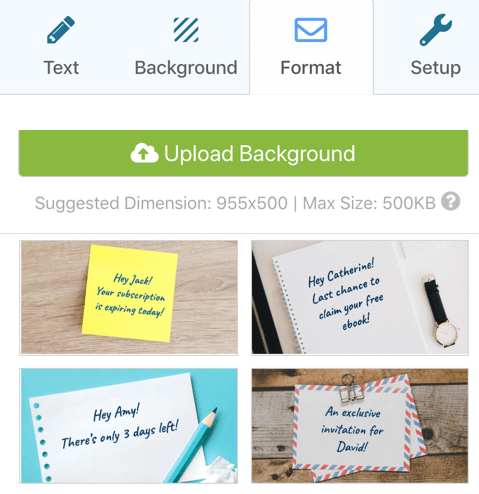
Want to upload your own custom background? No problem. Just click on the Format tab to upload your image. To ensure that the image looks great on Messenger, we recommend that you upload an image with the dimension 955px by 500px.
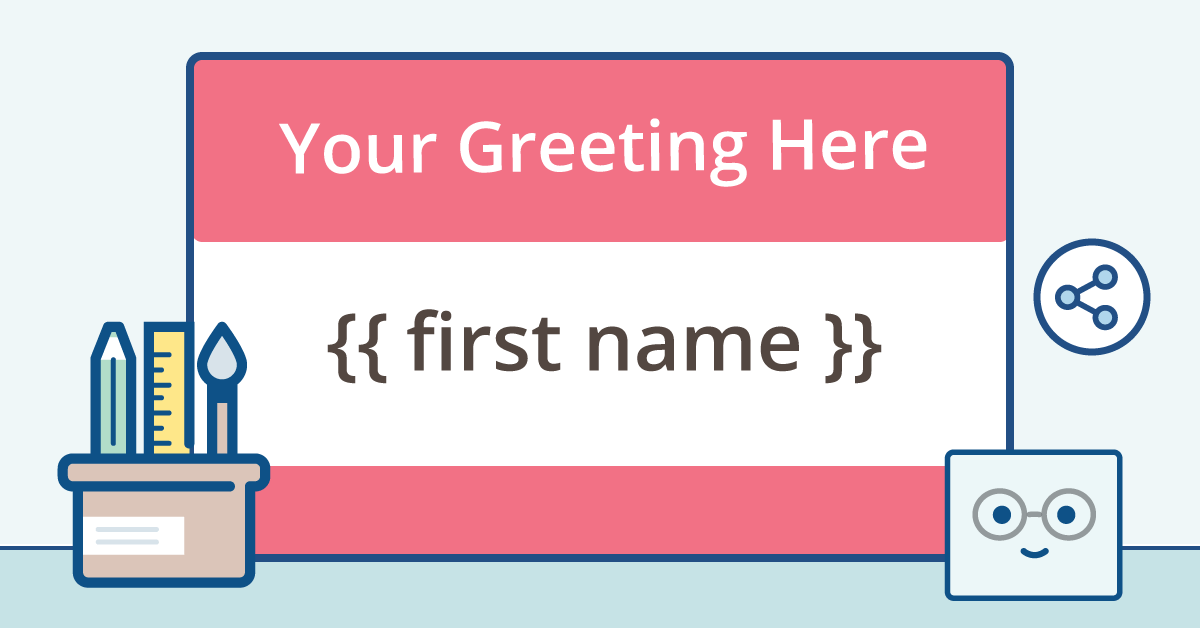
Step 2 – Add a Text box with Custom Fields
Next, enter in your message! To personalize the image, just enter a custom field name surrounded by two curly braces.
For example, to include the user’s first name, you would enter {{first name}}. If you know the person’s birthday, which you saved in the custom field “birthday”, you would enter {{birthday}}! A FotoScript Design can have up to 12 custom fields!
To reposition the text box or adjust the size, simply click and drag to make the changes. You can also add additional text boxes, change the font size, style, alignment, and color with just a few clicks.
You can also preview your image by entering different values under the “Sample Text” section.
Step 3 – Select Format to Send to Users
Once you’re done customizing your FotoScript Design, click on the Format Tab and select what you want to send to your subscribers. You can send a:
- image
- sharable gallery with a custom title, subtitle, and buttons that opens a website or calls a phone number or another message in your bot (using a share link)
- both image and PDF
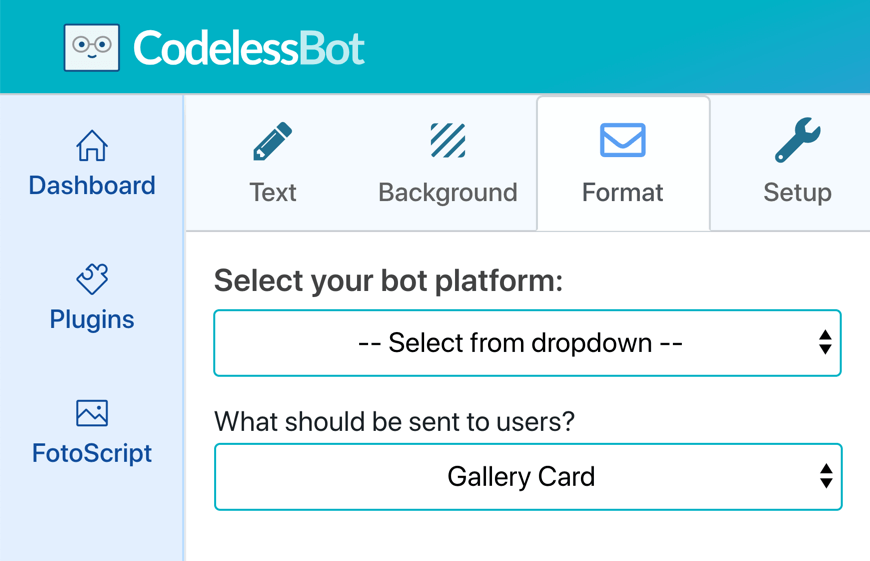
If you selected the gallery or image with buttons option, you’ll need to enter in additional detail.

Next, click on the “Setup” tab and follow the instructions to “install” the FotoScript Plugin into your Chatfuel, ManyChat or MobileMonkey Bot.
In the sections below, we’ll walk through the installation steps so you know what’s involved…
~ Jump to Chatfuel, ManyChat or MobileMonkey Instructions ~
How to Send Personalized Images using Chatfuel
Once you have your FotoScript Design set up and saved, you’ll need to “install” the FotoScript plugin into your Chatfuel Bot. Here’s how….
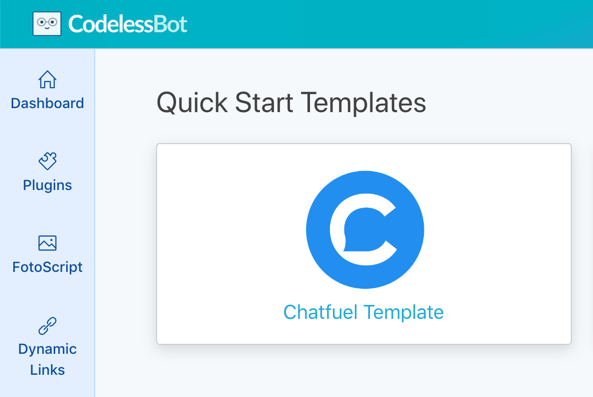
Step 1 – Download the Quick Start Template
In the CodelessBot Dashboard, click on “Templates” in the left-hand sidebar. Then click on “Chatfuel Templates” and follow the onscreen instructions to install the template.
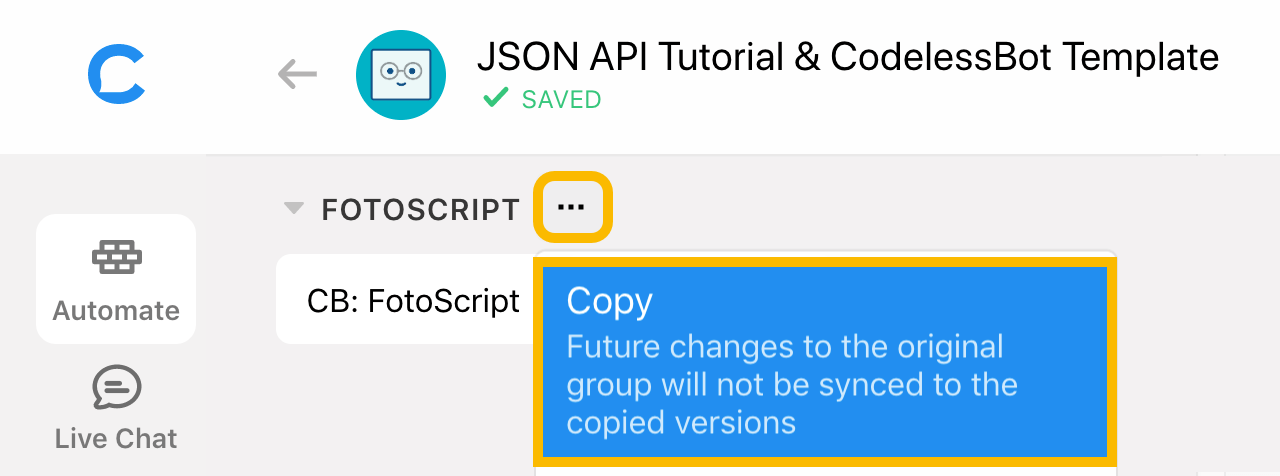
Step 2 – Copy the FotoScript Block to your actual Bot
Open up the “JSON API Tutorial & CodelessBot Template” Bot that you just installed in the previous step. In the Automate tab, you’ll find a folder “FotoScript”. Hover over the three dots next to the folder name and click on “Copy”.
Then, select your Chatfuel Bot from the dropdown list to copy the block into your actual live bot.
Step 3 – Enter Information about your FotoScript Design
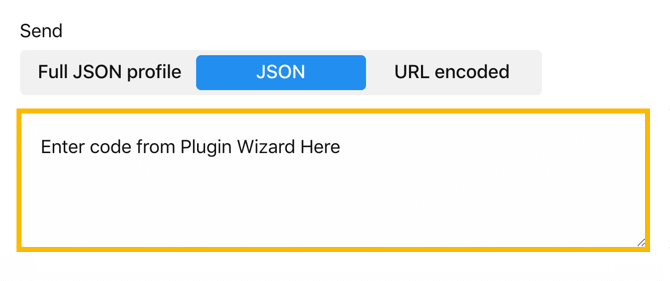
Navigate to your bot and open the new FotoScript block that you just copied. Scroll down until you see a “JSON API” card – which is where you’ll enter information about your FotoScript Design.
The quickest way to provide your Chatfuel Bot with all the necessary information is to open your FotoScript Design in CodelessBot. Then click on the Setup Tab. You’ll find the code automatically generated for you.
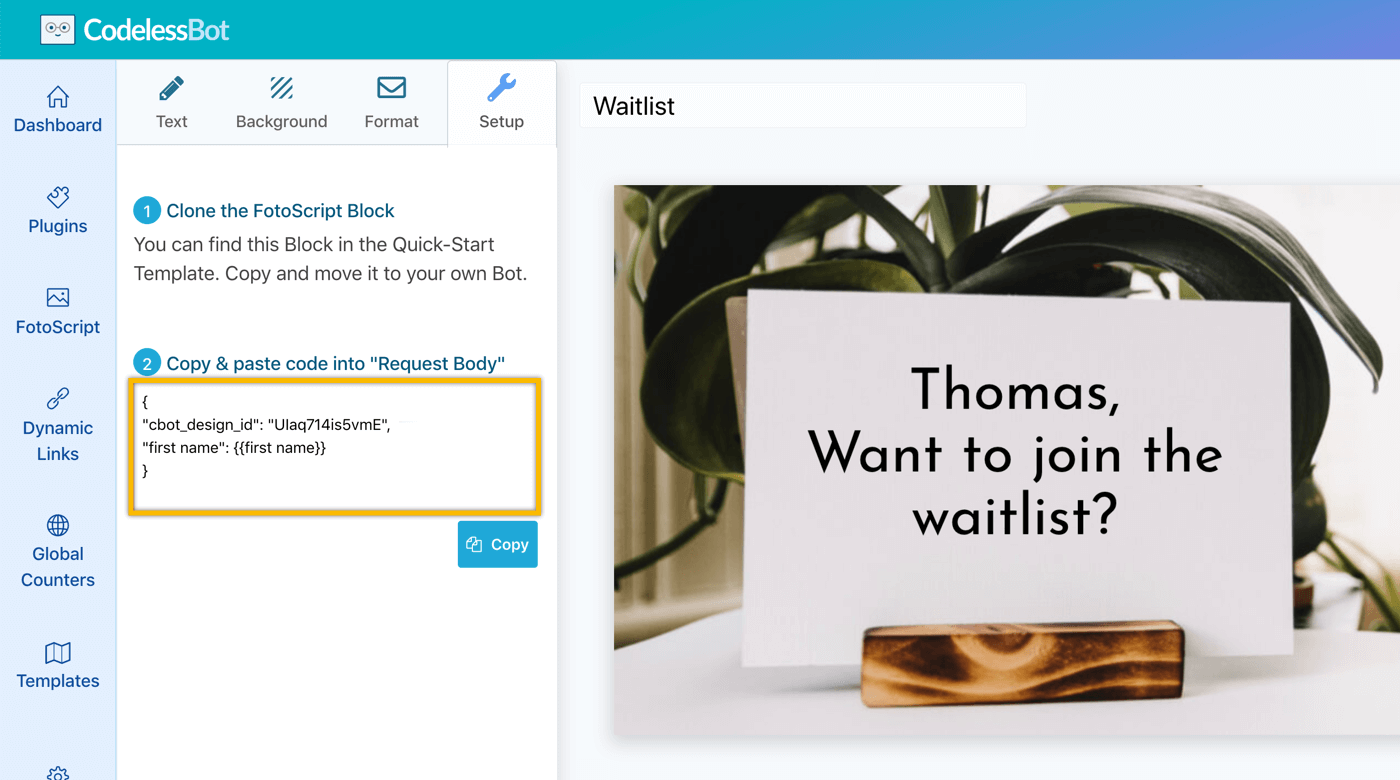
All you need to do is copy this code and paste it into your Chatfuel Bot.
Step 4 – Test your Block to see your Personalized Image
And that’s it! You are done! It really should only take you a few minutes to install FotoScript into your Chatfuel Messenger Bot!
Just be sure to test your block to preview your personalized image before you send it out to your audience.
~ Jump to Summary ~
Want to Test out FotoScript?
Click the button below and you’ll receive a personalized image with a custom greeting and your name!
~ Jump to Chatfuel, ManyChat or MobileMonkey Instructions ~
How to Send Personalized Images using ManyChat
Once you have your FotoScript Design set up and saved, you’ll need to “install” the FotoScript plugin into your ManyChat Bot. Here’s how….
Step 1 – Download the Quick Start Template
In the CodelessBot Dashboard, click on “Templates” in the left-hand sidebar. Then click on “ManyChat Templates”.
Follow the on-screen prompt to enter your CodelessBot Access Keys.
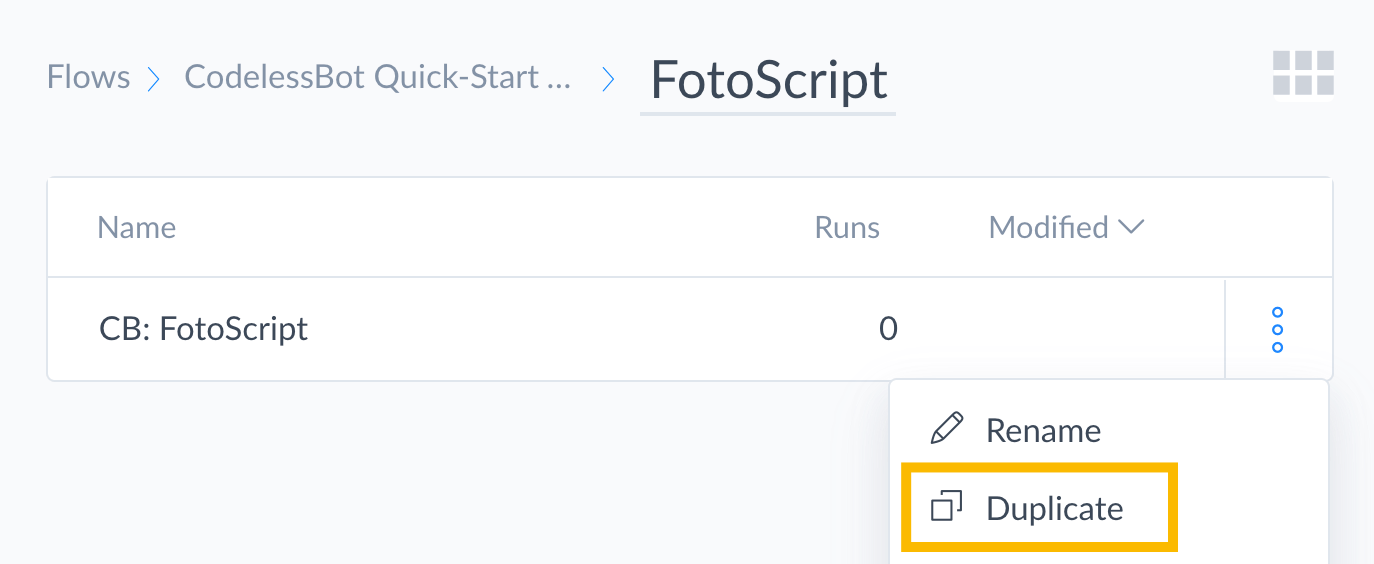
Step 2 – Clone the FotoScript Flow
Instead of modifying the original flow, we recommend that you clone the flow from this template. To do this, open up the CodelessBot Quick-Start Template folder that you just installed in the previous step. Click on the folder “FotoScript”.
Hover over the three dots next to “CB: FotoScript” and click on “Duplicate”.
Feel free to move this cloned flow to another folder and rename it if you wish.
Step 3 – Enter Information about your FotoScript Design
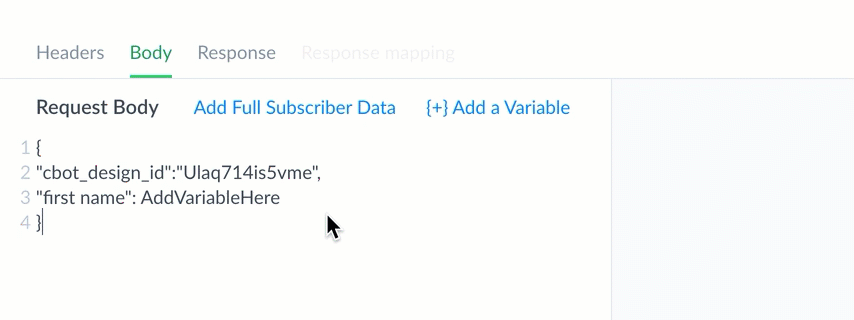
Open the new FotoScript flow that you just duplicated. You’ll find a “dynamic content block” step – which is where you’ll enter information about your FotoScript Design.
The quickest way to provide your ManyChat Bot with all the necessary information is to open your FotoScript Design in CodelessBot.
Then click on the Setup Tab. You’ll find the code automatically generated for you.
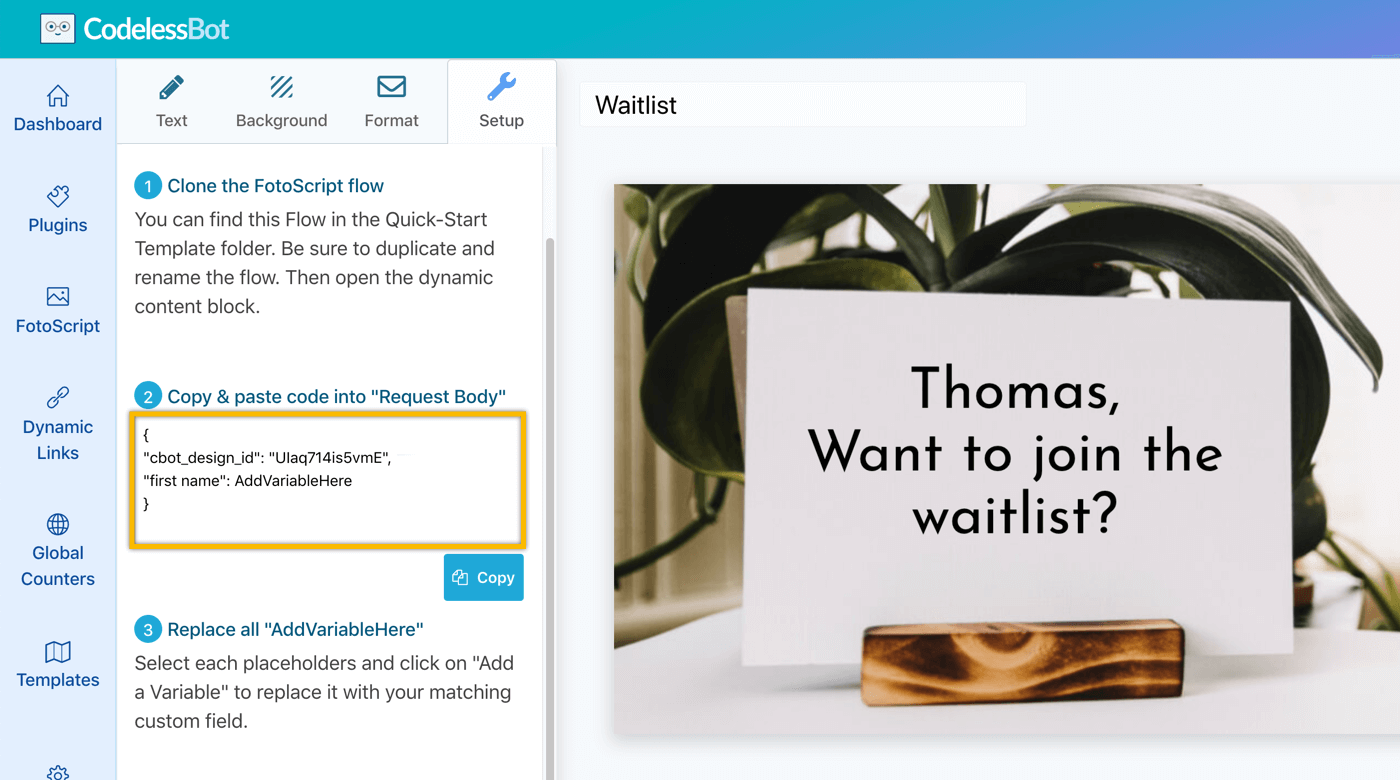
Just paste the code into the “Body” section of the dynamic content block.

Then, replace all placeholders with the correct ManyChat custom field by clicking on “Add a Variable”.
Step 4 – Test Your Flow & Publish Your Message!
Click on publish to save your changes and that’s it! You are done! It really should only take you a few minutes to install FotoScript into your ManyChat Messenger Bot!
Just be sure to preview the flow to make sure your personalized image looks great before you send it to your audience.
~ Jump to Summary ~
Want to Test out FotoScript?
Click the button below and you’ll receive a personalized image with a custom greeting and your name!
How to Send Personalized Images using MobileMonkey
Once you have your FotoScript Design set up and saved, you’ll need to “install” the FotoScript plugin into your MobileMonkey Bot. Here’s how….
Step 1 – Setup your Connections
To do this, just follow the instructions in our step-by-step guide to setup a connection and enter:
- The CodelessBot Request URL with your Access Keys
- The FotoScript Design ID
- Any attributes you used in your FotoScript Design (e.g., first name)
It should only take you a couple minutes to setup and all the information you need is available in the Setup Tab! All you need to do is copy the information from CodelessBot and paste it into your Connection in MobileMonkey!

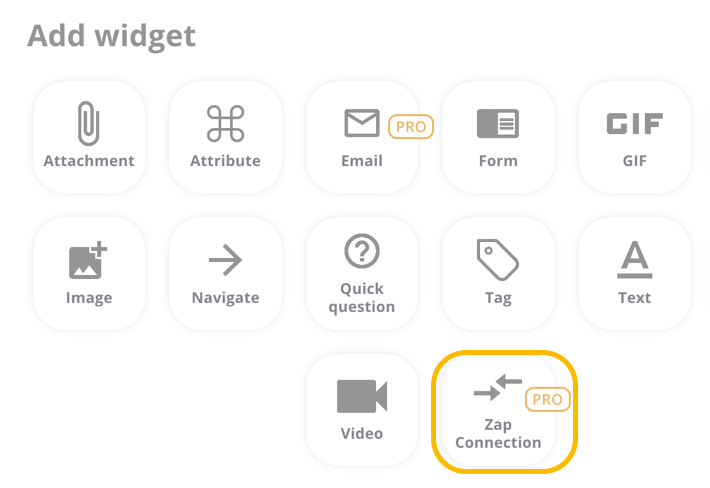
Step 2 – Add a Connection Widget to your Dialogue
Open up your dialogue. “Add Widget” and click on Zap/Connections. Then select the Connection that you just created from the dropdown list.
Step 3 – Test your Dialogue to see your Personalized Image
And that’s it! You are done! It really should only take you a few minutes to install FotoScript into your MobileMonkey Messenger Bot!
Just be sure to click on “Test Dialogue” to preview your personalized image before you send it to your audience.
~ Jump to Summary ~
Want to Test out FotoScript?
Click the button below and you'll receive a personalized image with a custom greeting and your name!
Summary
Messenger Bots are an extremely powerful tool since it allows you to build an interactive and fun experience for your visitors…so don’t just send a plain boring text message.
Try sending a personalized image to capture your audience’s attention. Or create a personalized gallery card, to allow your bot visitors to share it with their friends! There’s no coding is required and it’s easy to setup. All you need to do is:
- Create your image design (using the FotoScript Plugin)
- Add custom fields/attributes to personalize the message
- Install the FotoScript plugin into your Chatfuel, ManyChat or MobileMonkey
Want to Test out FotoScript?
Click the button below and you'll receive a personalized image with a custom greeting and your name!
You'll also like...
Want to Learn how CodelessBot works?
Or How to Build a Personalized Engaging Bot without Coding?